This week on deck, we start the New Year with Zoho Invoice. Though you have all of the power in Zoho Books to do invoices, this online application keeps it simple. It works great with both the desktop version through your web browser or the mobile app when you are in the field. Of course, like the rest of the finance suite, Invoice seamlessly integrates primarily with Cliq, CRM, & Projects. However, one exception to the integration is Zoho Inventory, but hopefully, as we start 2020, it will be fixed this year. As far as third-party applications, this online application supports both Google G Suite and Microsoft Office 365.
Zoho Invoice Features
Zoho invoice allows you to manage estimates, invoices, payments received, expenses, and tracking revenue analytics in a clean, uncluttered application. With customizable templates, you can fine-tune your billing system as you see best. These features will help you stay on track while delivering professional & consistent invoices. With CRM integration, your sales team can quickly send invoices directly from the mobile application in the field while pulling all the proper client information from the CRM. It will then pull the appropriate data fields from the CRM and put them into your invoicing or estimate template to send to clients while logging the Invoice in your CRM. All primary forms of payments are accepted up for whichever best molds to your business needs.
Creating A Custom Invoice Template
Today we briefly go over how to create a customized invoice template. Let us go ahead and start by opening up Zoho Invoice on the desktop.
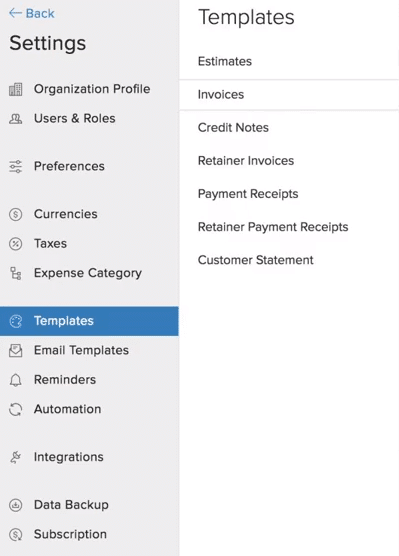
 -First, go to Settings (cogwheel) on the upper right.
-Then on the sidebar, halfway down will be Templates.
-Clicking on this will bring a drop-down menu of all the Templates (Estimates, Invoices, Credit Notes, Retainer Invoices, Payment Receipts, Retainer Payment Receipts, & Customer Statement)
-Now once you click on Invoices, multiple template designs will appear crafted for Zoho.
-Start by clicking +New on the top right and then choose your template. Next, pick your template language and then Use This.
The Template Properties will appear first with Header, Item Table, Total, & Footer on the left sidebar.
On the Template Properties page, we can do things such as create a name for the new template, insert an image for the invoice template, change color schemes, & font size.
For the Header page, we will be able to do exactly that, edit the header. This includes more customization for the background image, company logo, font coloring & size, and document title.
Item Table will allow you to customize the fields you want to have displayed. Under Labels in this section, you can change the label names and width on the table. Layout allows you customization of font size, color, and table border-color.
In the Total section, you will be able to choose your labeling and how the currency symbol will be displayed.
The final customization of your template is in the Footer section. Here you will be able to put payment options, signature image, require a signature, and terms & conditions.
Once all of these are completed go ahead and click save. Now go back to the template screen, hover over the template you just created, click the cogwheel, and set as default. Congratulations you have just made your first template! If you need to make more similar to the one you just created under the same option choose Clone as and make whatever minor changes you need to without having to redo everything. You will find throughout the Zoho suite cloning can be your best friend oftentimes!


