In this tip, we take a look at a better method for capturing lead form data inside of the CRM. Traditionally the data will go straight into the Leads or Contacts module. This isn’t always where we want the form data to live. Use this tip to design where your data goes upon form capture.
Key Takeaways
End Result Of Design Solution
Let’s start out by taking a look at what this design is going to look like at the end. Within the CRM record, there will be a related list named Web Form Submission. This will store all the forms that this lead/contact record has completed. Making it much easier to view the form submissions all in one place. It is a huge benefit to have the full form history. Including the form completion date, the exact form name, and any messages. This keeps record data better organized, rather than the traditional route of the form creating or updating the record and not storing the form data.
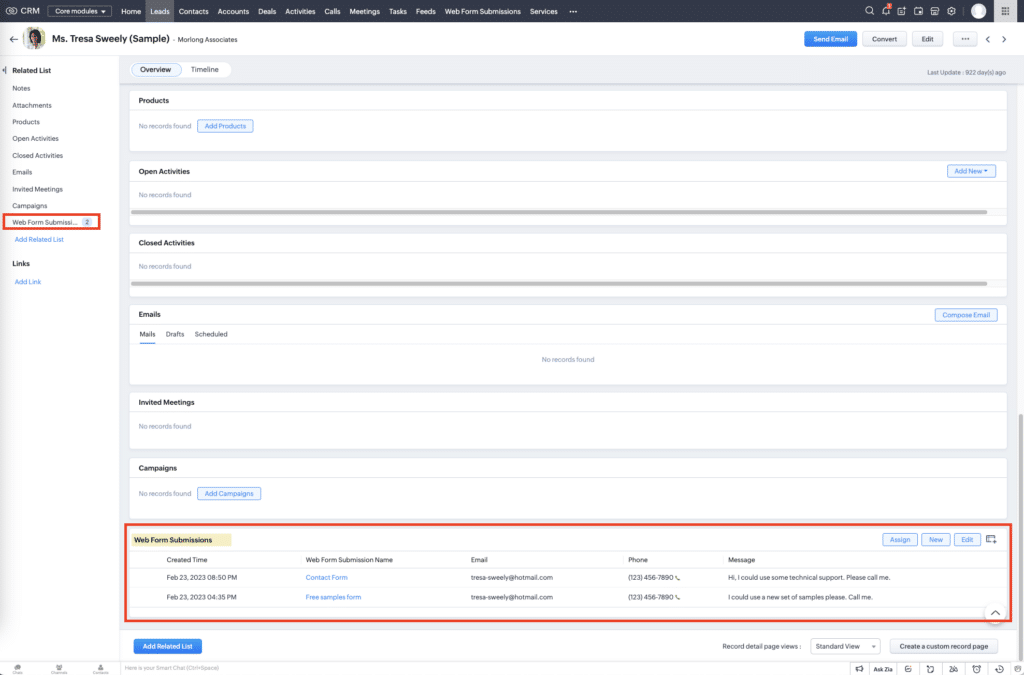
By capturing the form history, you are able to track the lifecycle of the lead in a more detailed manner. Keeping better track of the marketing efforts that pushed the particular forms and the deals that were closed before/after the form was filled out. This will provide insights into if the marketing efforts are working and if those efforts are improving sales.
Another result is that it will notify the user when a form is filled out by an existing record. After someone completes the form and it flows into the Web Form Submission list, a workflow rule will notify the salesperson by email. You can use any form to flow into this list!
Viewing The Custom Module
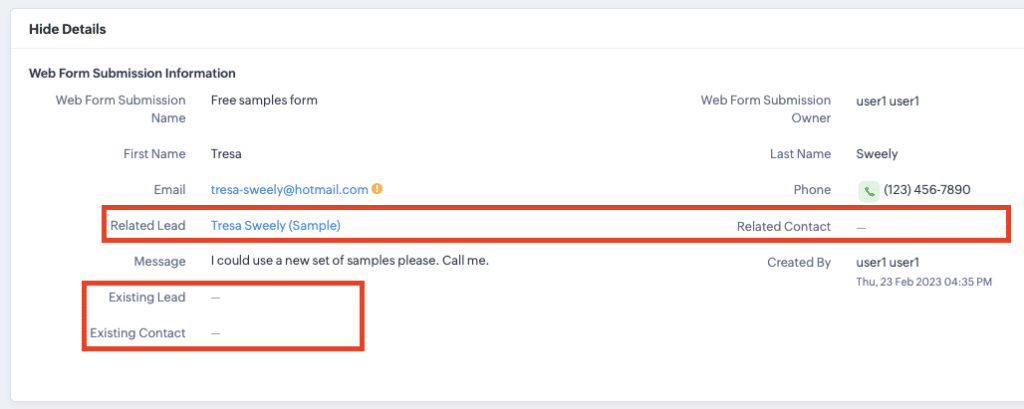
To capture all of the form data, we will create a new module named Web Form Submissions. Inside this module, you will want to include a field in the record for every field that is in your forms. Do this by creating custom fields to match those form fields! You will also need to add a lookup field for each of the different records that the form submissions might get related to. In our scenario, the form will be in relation to a lead or contact record.
We also created two check box fields, Existing Lead and Existing Contact. These let us know if this form was filled out by an existing record or if this form created a new record. These checkboxes will allow us to create workflow rules that notify the salesperson.
Workflow Rule For Processing The Lead
Now that we have the module set up, we need to decide what to do with these records when they come into the CRM. The workflow, New Webform :: Process Lead is going to trigger whenever a new webform submission record is created. Then decide what to do with that data. Inside this workflow, there is custom code to tell the workflow when to run. If you need help creating this custom code, check out our Zoho Deluge series!
Essentially, the code is confirming that there is no existing lead or contact record. It does so by checking the email, phone number, message, and first/last name within the form submission. If there is no matching record, it will create a new record. If there is a record already existing with this data then it will relate the form submission to that record and not create a new one.
You will want to make sure that every single form you integrate into CRM is now integrated into the Webform Submission module instead of into the Leads or Contacts modules. The New Webform :: Process Lead workflow will then decide where it belongs. If you are not familiar with integrating forms into CRM to a direct location, check out another tip Jordan did on Using Gravity Forms, Everest Forms, Or Zoho Forms To Connect To Zoho CRM.
Workflow Rule For Email Notification
Now that CRM knows what to do when a form is submitted, we want to set up a couple of workflows that will notify the salesperson. Remember the checkbox fields we created, Existing Lead and Existing Contact fields? These workflows are going to use the checkbox fields to determine what records to relate the submitted form to.
The workflows are going to send an email notification to the user on the record. This email will let them know that a form has been submitted on a record they are working on. Build out the email templates within the Customization – Templates section of the CRM settings. You can include whatever fields you see fit into the template and even include a button that will take you directly to the record in CRM.
Additional Resources
Want to learn more about Zoho CRM? Check out our other resources which include videos, articles, and guides by clicking here to visit the Zoho CRM resource page.


