You can create custom Zoho CRM links that incorporate data from CRM records. For example, you might create a link that automatically searches Facebook for a lead’s information by automatically plugging their first and last name into a generated link. When opened in a browser, this link will instantly perform a search on Facebook’s website for the lead’s page.
You can also create links for content you already have, but might not be presented in the most convenient format. For example, you might store your leads’ Twitter handles. However, the handle alone won’t link to their Twitter feed. Instead, you’ll need to either paste their name at the end of a properly formatted link or search for their username on Twitter.
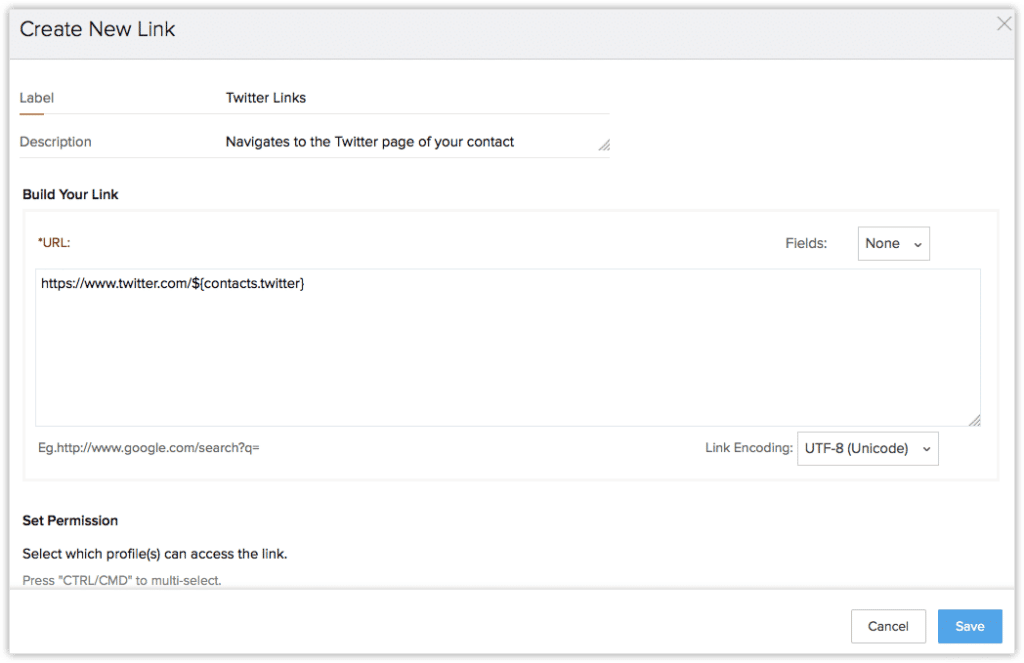
With a custom-built link, Zoho CRM can automatically grab the Twitter handle from the appropriate field, slap it on the end of a properly formatted Twitter link, and immediately bring you to the page. Provided that the Twitter account with the provided name exists, you’ll see all your leads’ tweets in a moment. For example, the link might look something like https://twitter.com/{Leads.Twitter ID}. The token inside the curly braces will be replaced with the text in the Twitter ID field for each record in the Leads module, automatically generating a valid link to each person’s Twitter feed from within their lead details page.
Creating Custom Zoho CRM Links
Navigate to Setup > Customization > Modules and Fields and select the module you want to create a link within.
In the Links and Buttons tab, click Create New Link. On this page, you can begin to build your link.

Enter a name for the link in the Label text box. This name will appear above the link on the record’s detail page, so make sure it’s appropriately descriptive.
Enter a description that explains what the link does and why. This might seem redundant now, but a clear description will help you troubleshoot the link or sort through multiple links created at different times by different users.
Enter the text of the URL that provides the basic structure of your completed link. For example, this might be a Google Images search with the search parameter removed or a Facebook link with the page name removed.
Since you’ll be replacing parts of this link with data from the record, you’ll want to identify the gaps you’re filling, and make sure you’re filling in the right spaces with the right content. The key challenge is putting the data in the right places. The easiest way to get a valid string is to actually perform the search or visit the web page with a known-valid URL. Then, copy the URL and replace the search terms or page name with the appropriate token.
Trial and Error
We recommend experimenting with the links by manually replacing text strings in your browser first, to ensure it has the desired effect. Otherwise, you might end up rolling out broken links across all your leads simultaneously, which won’t help anyone.
Once the basic structure of the link is set, we can start adding data from the records. To insert data from the record into the link, click the Fields dropdown above the URL field. Then, choose the Module or CRM Variable and the corresponding field from the drop-down list. Once selected, that field will be inserted as part of the URL. This field will be replaced with the appropriate text string on each record.
In the Set Permissions section, choose the user profiles that are allowed to access the links. Use these features to limit sensitive links to permitted personnel.
Click Save to commit your changes and roll them out over all your CRM’s records.
You can find the newly created link on the record details page for any completed record in the appropriate module. These links will be accessible by any user with sufficient permissions, or all users if no limiting permissions were set.


